A valve spring replacement is not just a bench task. It is a decision point: is the engine suffering from a weak spring, a timing error, a worn retainer, an incorrect cam package, or a sourcing problem that will repeat across stock? For repair chains, engine remanufacturers, fleet workshops, and distributors, the answer must be proven with measurements, photos, part traceability, and a controlled installation method. This guide shows how to diagnose the fault, replace the spring without losing control of the valve train, inspect the related hardware, and qualify replacement parts for repeat B2B supply. It applies broadly to OHV, OHC, and DOHC engines, but the vehicle service manual remains the authority for timing procedures, torque values, special tools, and safety instructions. Driventus is an independent aftermarket manufacturer; brand names are referenced for fitment only.
Decision point: replace the spring or keep diagnosing?
Do not begin with the compressor. Begin with proof.
A weak or broken valve spring can cause valve float, misfire, low compression, noise, and repeat warranty claims. So can ignition faults, fuel delivery problems, sticking hydraulic lifters, worn cam lobes, bent valves, incorrect valve lash, restricted oil supply, and cam timing errors. Replacing the spring without isolating the fault can make the repair look complete while leaving the real cause untouched.
Use the following findings to justify spring removal:
Misfire above a repeatable engine-speed point, often 3,500–6,000 rpm depending on cam profile and spring load
Ticking, tapping, or intermittent valve-train noise after oil pressure and lash checks are complete
Low or uneven compression, with more than 10–15% cylinder-to-cylinder variation requiring further diagnosis
Leakage above the workshop limit during a leak-down test, commonly investigated when leakage exceeds 10–20%
Rough idle after timing belt, timing chain, cylinder head, camshaft, rocker, or follower work
Valve float confirmed by dyno, road-load, oscilloscope, or scan-tool analysis
Broken coil seen during rocker cover, borescope, or cylinder head inspection
Excessive valve stem movement, damaged retainer, displaced keeper marks, or abnormal valve tip height
Once the decision is made, prepare the job like a controlled inspection, not a quick parts swap:
1. Disconnect the battery and disable fuel or ignition as required by the service manual. 2. Clean the cylinder head, rocker cover, and surrounding area before opening the engine. Dirt in oil galleries can damage cam journals, lash adjusters, followers, and bearings. 3. Record cylinder numbers, cam cap positions, rocker arms, shims, hydraulic lifters, followers, and matched components before removal. Use a tray marked by cylinder and intake/exhaust position. 4. If the cylinder head stays installed, bring the piston of the serviced cylinder near top dead centre according to the engine procedure. Many workshops set the piston 5–15 mm below TDC when compressed air is used, then confirm the crankshaft cannot rotate unexpectedly. 5. Support the valve with regulated compressed air through the spark plug or injector port, typically 90–120 psi where the adapter and engine design allow it, or use an approved rope method where suitable. 6. Cover oil drain passages and open galleries so keepers, shims, or small fasteners cannot fall into the engine. 7. Keep removed springs, retainers, keepers, seats, and seals in labelled bags until the repair is approved and any warranty review is closed.
For multi-location repair networks, make these controls part of the job card. Minimum records should include the customer complaint, diagnostic result, cylinder location, inspection photos, spring measurements, installed height where accessible, replacement part batch number, technician ID, compressor tool ID, and final hand-rotation check.
Tooling comparison: what belongs on the bench
The right tool prevents a small job from becoming a cylinder-head repair. Improvised compressors can slip, nick the retainer, damage the valve stem tip, deform the spring seat, or release the keepers suddenly. A B2B workshop should approve tool types centrally and audit their condition.
Item
Purpose
Procurement or workshop note
Valve spring compressor
Compresses the spring to remove and install keepers
Select the correct type for OHV, OHC, DOHC, or in-head service work; check jaw wear and alignment every 6 months
Magnetic pick-up or keeper tool
Removes split collets/keepers safely
Prevents loss into oil drain passages; use a clean magnet so metal chips are not transferred
Dial caliper or height gauge
Measures free length, diameter, and installed height
Use 0.01 mm resolution where possible; record values against the service limit or approved drawing
Micrometer
Measures wire diameter more accurately than calipers
Preferred for wire sizes around 2.5–5.5 mm because caliper pressure can distort readings
Valve spring tester
Checks load at specified heights
Important for remanufacturing, claims analysis, and supplier approval; calibrate at least annually
Compressed air adapter
Holds the valve closed with the cylinder head installed
Check regulator, hose, and adapter thread condition before use; confirm the crankshaft is restrained
Seal installer
Installs valve stem seals squarely
Reduces seal lip damage and oil-consumption risk; match installer depth to the guide design
Torque wrench
Reassembles cam caps, rocker shafts, carriers, and covers
Follow the engine-specific torque sequence and angle procedure; use calibrated tools only
Timing tools
Locks crankshaft and camshaft positions where required
Essential when camshafts, belts, chains, or phasers are disturbed
</tr></thead><tbody> </tbody></table>Review these parts before releasing the job to the technician:
Valve spring set, including inner and outer springs where applicable
Valve stem seals and any required seal retainers
Retainers and keepers if wear, pitting, fretting, or poor taper contact is visible
Spring seats, locators, or shims if specified by the engine design, often in 0.25 mm or 0.50 mm increments for adjustable applications
Rocker cover gasket, spark plug tube seals, and related cover hardware
Camshaft seals, timing belt, timing chain, guides, tensioners, or phaser bolts if disturbed
Engine oil and filter where contamination, metal debris, or failed components are found
Before a replacement spring reaches the bench, confirm application, engine code, valve position, springs per valve, quantity per engine, and packaging format: loose pieces, boxed cylinder sets, or full-engine kits. Driventus valve spring programmes are available within broader engine component sourcing through our catalog and the engine category page at /products/engine-components.html. For engine families requiring non-standard wire diameter, free length, end grinding, seat load, or packaging, buyers can review custom manufacturing options.
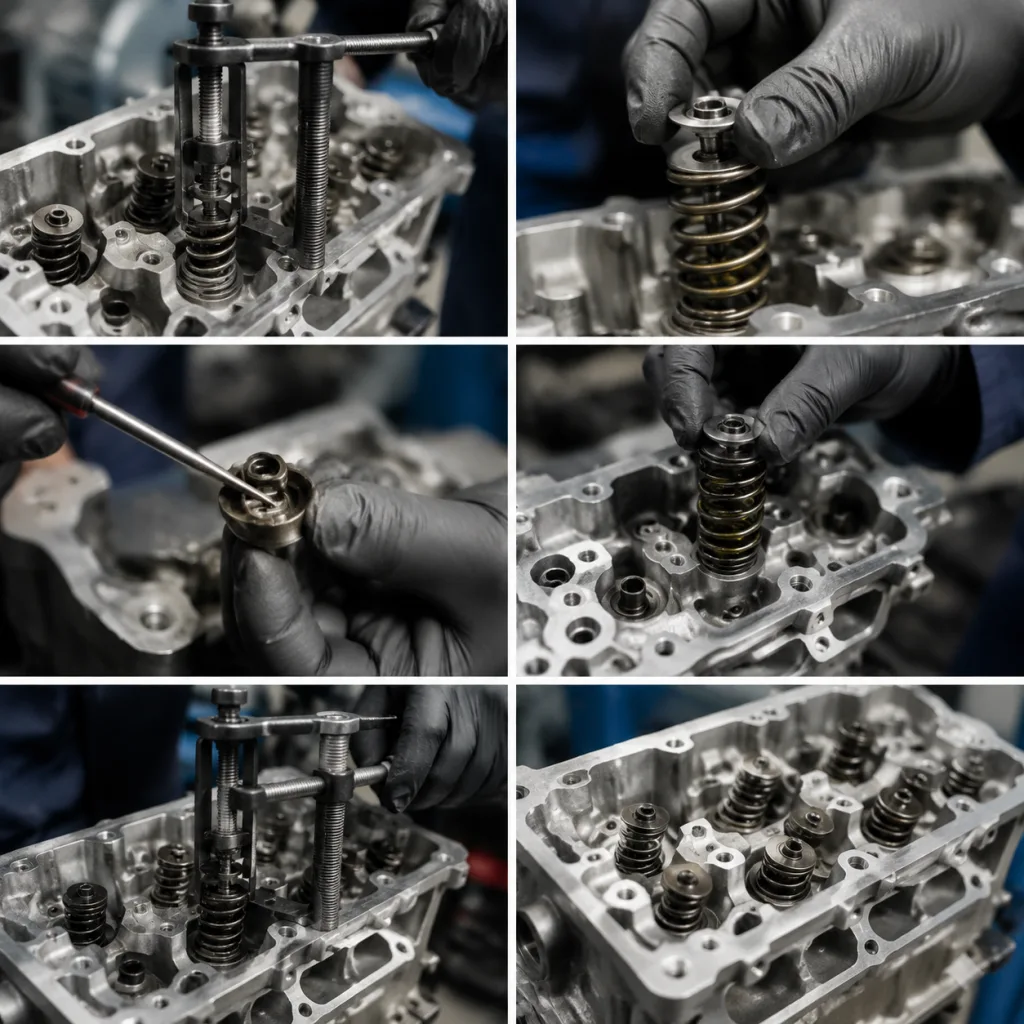
Valve spring how to replace: controlled workshop sequence
The layout changes by engine. The control points do not. Use the service manual for special tools, timing alignment, camshaft removal, torque values, sealant locations, and single-use fasteners.
1. Open only what is needed. Remove the engine cover, ignition components, breather hoses, rocker cover, cam carrier, or related parts needed for access. Label fasteners and store components by location. If sealant is present, use only approved plastic or non-damaging tools and keep debris out of oil passages.
2. Set the cylinder position. Rotate the crankshaft by hand to the specified position. If the cylinder head stays on the engine, support the valve with compressed air or another approved method before releasing spring pressure. Never use the starter motor during this operation.
3. Unload the valve train. Remove rocker arms, cam followers, lash adjusters, or camshafts only as directed. On overhead-cam engines, loosen cam caps gradually and in sequence, usually 1/4–1/2 turn per pass, to avoid bending the camshaft or damaging journals.
4. Inspect before disturbing evidence. Look for a broken coil, tilted retainer, loose keeper, damaged spring seat, or abnormal valve height. Photograph defects before parts are moved if the job may become a warranty claim. Record intake or exhaust position; exhaust springs often see higher thermal exposure.
5. Compress the spring squarely. Position the compressor on the retainer and spring seat. Compress only enough to expose the keeper grooves, typically 2–4 mm beyond the point where the keepers loosen. Extra travel can overstress the spring, distort the retainer, or make the tool unstable.
6. Remove keepers and retainer. Use a magnetic tool and keep drain openings covered. Inspect keepers for pitting, step wear, fretting, loss of taper contact, or poor engagement in the valve groove. Replace any keeper pair that does not sit evenly as a matched pair.
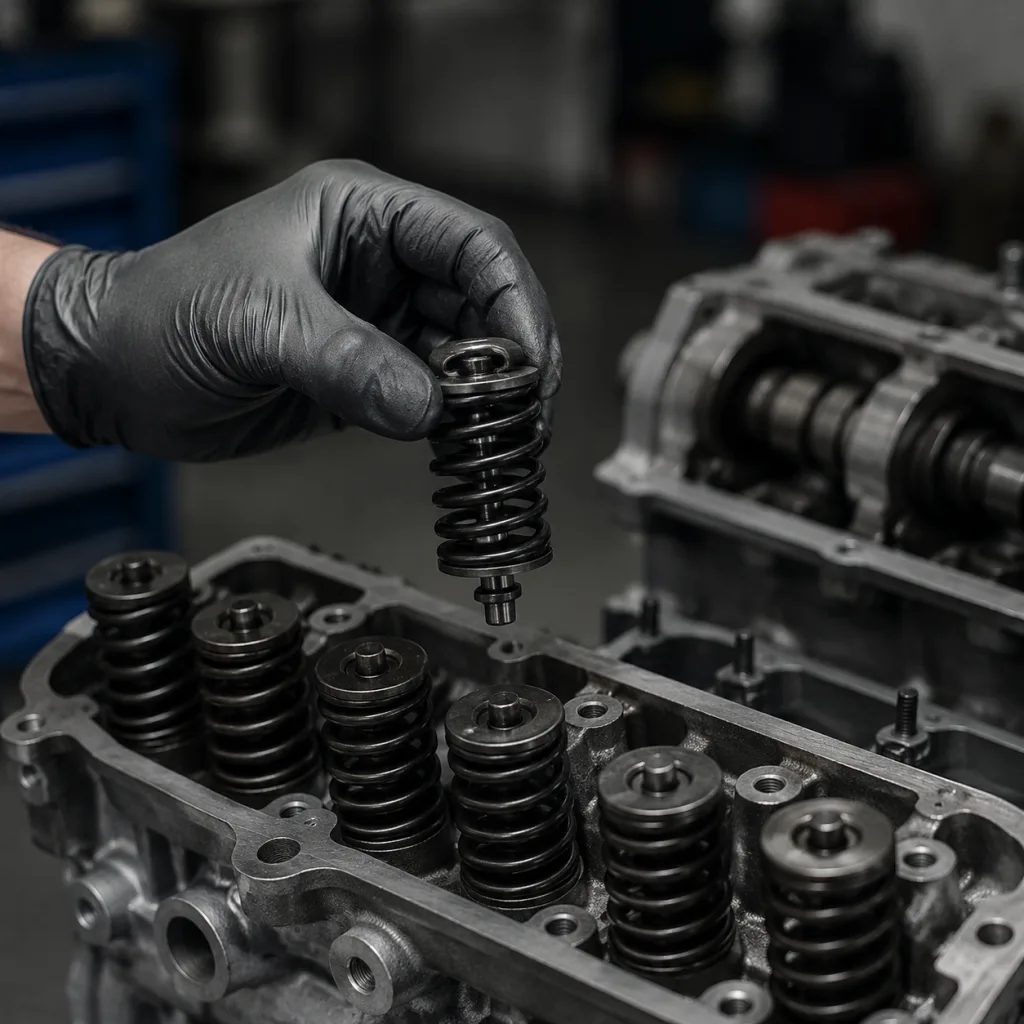
7. Remove the old spring. Lift off the retainer, spring, and removable spring seat or locator. Note orientation if one end is close-wound, ground differently, colour-marked, or specified to face the cylinder head. Do not mix inner and outer springs between valves.
8. Check the valve and guide area. Inspect stem tip wear, keeper groove condition, guide side play, spring seat damage, seal condition, and signs of piston-to-valve contact. Replace the valve stem seal when the spring is removed unless the engine procedure gives a different instruction. If the valve drops, binds, or will not seal with air pressure, stop and inspect the cylinder head before continuing.
9. Measure the replacement spring. Compare free length, wire diameter, outside diameter, inside diameter, end squareness, coil direction where specified, and load data with the approved drawing or service limit. Visual similarity is not enough. Typical inspection records free length to 0.1 mm, wire diameter to 0.01 mm, and load at specified installed and open heights.
10. Install spring and retainer. Clean the seat area, place the spring or locator correctly, and install the retainer. Compress the assembly until the keeper grooves are visible without forcing the spring toward coil bind. Maintain the service-manual coil-bind margin; where no aftermarket engineering release exists, many rebuilders use at least 1.0–1.5 mm clearance at maximum lift as a minimum review point.
11. Fit keepers, then release slowly. Use a small amount of assembly grease to hold the keepers only if permitted. Release the compressor gradually, then confirm both keepers sit evenly and fully in the retainer. Tap the retainer lightly with a soft drift only if the service procedure allows it, then recheck keeper seating.
12. Verify installed height. Measure installed height where the design allows access, from the spring seat to the underside of the retainer. Add, remove, or change shims only when the engine specification permits it and the resulting seat load remains within specification. A 0.50 mm installed-height error can materially change seat load, especially on high-rate performance or diesel applications.
13. Reassemble the valve train. Reinstall followers, rockers, camshafts, carriers, and caps in their original positions unless new parts are specified. Use the correct lubrication, torque sequence, angle setting, and sealant application. Replace torque-to-yield bolts, phaser bolts, or stretch fasteners when the manual requires it.
14. Prove the repair before start-up. Turn the crankshaft by hand through two complete revolutions. Recheck timing marks, lash or adjuster position, and abnormal binding. After start-up, listen for valve-train noise, check oil leaks, confirm oil pressure, clear diagnostic codes where appropriate, and test under the same load condition that produced the original fault.
In production repair environments, retain removed springs and related parts until the claim window is closed. Link retained parts to the repair order, engine serial number, supplier batch, measurement record, and replacement kit lot number.
Spec deep-dive: spring data buyers should not skip
A valve spring is approved by data, not by appearance. Two springs can look interchangeable and still differ in material, rate, heat treatment, surface finish, or fatigue life. Procurement teams should request dimensional and performance data by engine application, part number, and drawing revision.
Key specification points:
Free length tolerance controlled to the drawing or application requirement; common production targets are ±0.30 mm, but the released drawing controls
Outside diameter and inside diameter for retainer, guide, and spring seat clearance, typically checked at three positions around the coil body
Wire diameter, wire grade, and material standard, such as Si-Cr or Cr-V spring steel where specified
Spring rate across the working range, recorded in N/mm or kgf/mm with the test height interval stated
Load at installed height and open height, with both height and allowable load tolerance specified; ±5–8% is common unless the engine drawing is tighter
Solid height and verified coil bind margin, with measured solid height rather than a value calculated from coil count alone
End grinding, squareness, and parallelism of ground ends; many approval plans use squareness within 1.5–2.0° or a drawing-specific value
Coil direction if specified by the engine design, especially where inner and outer springs are wound in opposite directions
Surface treatment such as shot peening, phosphating, coating, oiling, or corrosion protection where required
Heat-treatment process controls and hardness range where applicable
Fatigue test cycles, test height, test frequency, and acceptance criteria; a common aftermarket validation file may include 500,000 to 2,000,000 cycles depending on duty and customer requirement
Dimensional sampling plan and control method for mixed production lots, such as AQL-based final inspection plus 100% visual sorting for critical defects
Packaging method to prevent corrosion, deformation, label loss, and batch mixing during 30–60 days of sea freight and long warehouse cycles
A practical approval file includes an inspection report, material certificate, heat-treatment record, load test results, fatigue test summary, packaging specification, PPAP-style dimensional layout where requested, and traceability sample. For incoming inspection, distributors often test 3–5 pieces per lot for dimensions and load, then increase sampling when the lot is new, the supplier changed wire source, or the application has prior claims. Driventus manages engine component production under IATF 16949:2016 and ISO 9001:2015. Our internal quality system covers incoming material checks, in-process inspection, final sampling, traceability, nonconforming material control, and corrective action handling.
For markets requiring substance control, buyers should also review REACH (EC) No 1907/2006 for the European market and any customer-specific restricted-substance requirements. For complete engines or emissions-related assemblies, vehicle-level regulations such as ECE R-83 may be relevant, although a valve spring is normally assessed as part of the engine system rather than as a standalone emissions device.
Failure modes: why the same repair comes back
Repeat failures rarely have one simple cause. The spring may be wrong, but the installation, adjacent hardware, cam profile, timing setup, or inventory control may be wrong too. Use the table as a warranty triage tool, not just a training aid.
Error
Likely result
Preventive check
Incorrect installed height
Low seat load, excessive seat load, or coil bind
Measure installed height and shim only to specification; record before/after height
Reused worn keepers
Retainer movement, poor locking, or valve drop risk
Inspect taper contact, groove fit, and keeper seating under magnification
Wrong spring for cam profile
Valve float, follower damage, or excessive stress
Match load, rate, open height, and maximum valve lift to the application
Damaged valve stem seal
Oil consumption, deposits, and smoke on start-up
Use the correct seal installer and inspect the guide area
Spring installed off-seat
Side loading, noise, and early breakage
Confirm seat, locator, and retainer position before release
Timing not reset correctly
Piston-to-valve contact and bent valves
Rotate the engine by hand for two crank revolutions before start-up
Mixed batches in one engine
Uneven valve control and inconsistent load
Control batch traceability and package springs as matched sets
Cam cap or rocker hardware torqued incorrectly
Cam binding, oil leakage, or abnormal valve-train noise
Use the specified torque sequence, angle setting, and lubrication points
Debris left in the cylinder head
Lifter, follower, cam journal, or oil-control damage
Clean before disassembly and cover open galleries
Spring run too close to coil bind
Heat, stress concentration, and early fracture
Confirm maximum lift plus safety margin against measured solid height
Retainer-to-seal or retainer-to-guide contact
Broken seals, noise, and valve-train damage
Check clearance at full lift during non-standard cam or spring changes
</tr></thead><tbody> </tbody></table>For distributors, mixed inventory is a commercial failure mode. Springs with similar dimensions may differ in rate, material, surface treatment, or heat-treatment history. Bin labels should show part number, batch number, production date, application notes, quantity per set, and inspection status. When replacing a complete engine set, workshops should avoid mixing used and new springs unless the service manual specifically permits a partial repair and the measured loads are acceptable. For warranty return analysis, ask the workshop to return the spring, retainer, keepers, seat, valve seal, and installation photos together. A spring alone rarely proves root cause.
Sourcing scenario: from RFQ to repeat supply
Imagine a repair chain sees repeat high-rpm misfire claims after stocking a low-cost spring set. The workshop procedure is documented, but branches are mixing batches, incoming load data is missing, and the supplier quotes by size rather than by engine application. The commercial problem is now technical.
A reliable sourcing process should test the supplier before the first bulk order:
Can the supplier provide load test data at installed and open heights for the exact application?
Are springs fatigue-tested by application family, cam profile, or only by generic size?
What traceability method links wire material, heat treatment, production lot, inspection data, and finished goods?
Are material certificates, heat-treatment records, and inspection reports retained by lot, and for how many years?
What corrosion protection and packaging are used for sea freight, humid storage, and long warehouse cycles?
Can the supplier support private label, barcode labels, batch labels, and application cross-reference files?
What is the response process for dimensional complaints, field failures, or mixed-batch findings, including 8D timing?
Can samples be supplied with measured data before a distributor commits to bulk stock?
What MOQ, price tier, tooling, packaging, and lead-time assumptions apply to standard parts versus custom springs?
Separate standard catalogue parts from engineered or private-label programmes. Standard valve spring sets can often be quoted by existing application and stocked part number, with price driven by annual volume, set size, packaging type, and inspection documentation. Custom springs require drawing confirmation, sample build, load testing, packaging approval, and sometimes dedicated tooling. The unit price may improve at volume, but the first order should allow time for engineering review and validation.
A useful RFQ states target annual volume, first-order quantity, release schedule, required Incoterm, label format, carton quantity, pallet requirements, and destination market. Buyers should expect lower MOQ for existing catalogue items and higher MOQ for custom wire diameter, non-standard end grinding, special coating, or private-label packaging. Lead time is usually shortest for stocked or repeat-production items and longer when new tooling, wire procurement, fatigue testing, or customer-specific packaging is required. Compare prices on the same basis: spring only versus kit, loose bulk versus boxed set, standard inspection versus added load-test reporting, and EXW/FOB/CIF terms.
Driventus manufactures and supplies engine and powertrain components from Taizhou, Zhejiang, for aftermarket distributors, OEM/Tier-1 supply programmes, and multi-location repair chains. For valve springs, buyers may request dimensional review, sample inspection, load testing support, packaging confirmation, batch labelling, and application mapping. We do not claim approval or endorsement by any vehicle manufacturer. Driventus is an independent aftermarket manufacturer; brand names are referenced for fitment only.
If your programme requires OE part-number cross-references, provide the cross-reference list, drawings where available, engine codes, model-year coverage, target market, expected monthly demand, and packaging requirements. Generic references may be formatted in procurement files as OE 06A… or OE 11251… only when supported by the buyer’s application data.
Frequently asked questions
On many engines, yes, if the valve can be supported with regulated compressed air, commonly around 90–120 psi where the engine and adapter allow it, or another approved method and there is enough access for the correct compressor. The service manual decides the procedure. If valve guide wear, seat damage, bent valves, piston contact, leakage, or debris is suspected, removing the cylinder head is usually the safer inspection route.
For high-mileage engines, performance applications, remanufacturing, and fleet warranty control, replacing springs as a set is often preferred because spring load changes with age and heat cycles. For isolated damage, follow the service manual and compare measured free length and load data before approving a partial replacement. Do not mix batches in one engine unless the measured loads and application controls support it.
Request free length, wire diameter, outside and inside diameter, installed-height load, open-height load, spring rate, solid height, coil bind margin, material grade, surface treatment, fatigue test summary, packaging method, MOQ, price tier, lead time, and batch traceability records. These data points help confirm fit, load control, durability, and commercial suitability before bulk purchasing.
If you are building a valve spring sourcing file, Driventus can review drawings, samples, load requirements, application lists, MOQ targets, price tiers, lead-time plans, batch labelling, and packaging needs. Send your technical questions or programme details to [request a quote](/contact.html).