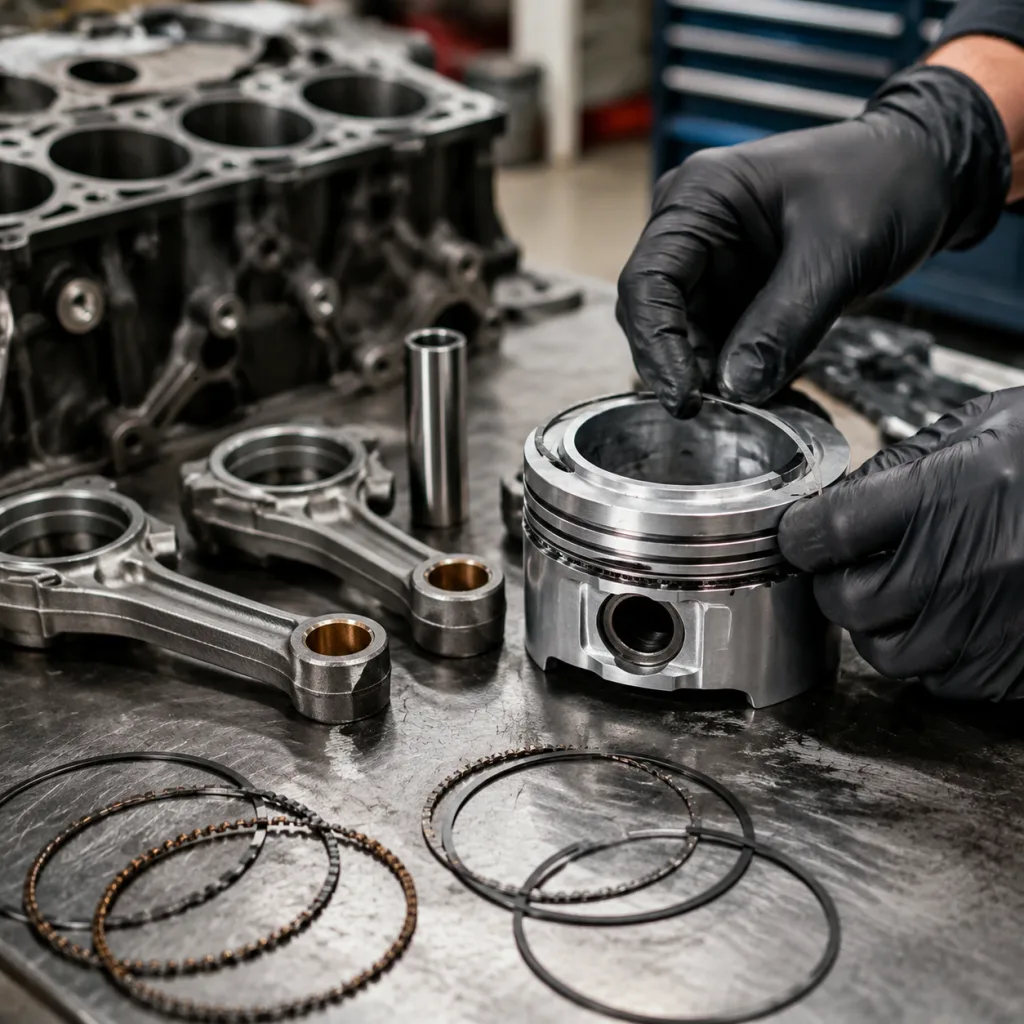
Piston ring how to replace work fails when it is treated as a quick parts swap. It is a measurement-controlled rebuild operation. The ring set has to match the cylinder bore, piston groove geometry, axial height, radial wall, material, coating, tension, oil-ring design, and end-gap requirement before a technician opens the ring pack.
For distributors, repair chains, fleet workshops, and engine rebuilders, that control affects oil consumption, compression stability, emissions performance, customer satisfaction, and warranty cost. Typical passenger-vehicle bores are about 70–100 mm. Light-commercial diesel bores often sit around 85–105 mm. Heavy-duty programs may exceed 120 mm. If the piston is marked +0.25 mm, the replacement ring set must be +0.25 mm. A standard ring forced into an oversize repair is not a controlled repair.
This article looks at replacement from two angles: what the workshop must do at the bench, and what the purchasing team must specify so the correct part reaches that bench. Driventus manufactures piston rings and related engine components in Taizhou, Zhejiang for B2B aftermarket and OEM/Tier-1 supply programs. Production is managed under IATF 16949:2016 and ISO 9001:2015, with dimensional inspection, material traceability, batch-level checks, and control of critical characteristics such as axial height, radial wall, free gap, face profile, coating condition, and tangential load. Driventus is an independent aftermarket manufacturer; vehicle brand names and OE references are used only for fitment identification.
Decision Gate: Should This Engine Receive Rings Yet?
Do not begin with the catalogue. Begin with the engine in front of you.
Before teardown, confirm engine code, displacement, fuel type, emissions configuration, production range, and intended repair size. Many warranty disputes start with a simple mismatch: a ring set is ordered by vehicle model, but the engine has already been rebored, sleeved, or fitted with a non-original piston. If the piston crown is marked STD, 0.25, 0.50, 0.75, 1.00, or an inch oversize equivalent, that marking belongs on the purchase order and repair instruction.
Use this decision gate before issuing a PO or authorising the job:
Engine model and bore size from service data, teardown records, or fleet maintenance history; record nominal bore and actual measured bore to 0.01 mm where possible
Standard or oversize piston marking, such as STD, +0.25 mm, +0.50 mm, +0.75 mm, +1.00 mm, or local equivalent
Ring pack layout: top compression ring, second compression/scraper ring, and oil control ring; common examples include 1.2/1.2/2.0 mm, 1.5/1.5/3.0 mm, 1.75/2.0/3.0 mm, and heavier diesel layouts depending on engine design
Ring cross-section, axial height, radial wall, and piston groove width; measure the ring and groove when piston history is unknown
Material and coating requirements, including cast iron, ductile iron, steel, nitrided steel, phosphate, PVD, molybdenum, or chrome-faced surfaces
Emissions market requirements where applicable, including ECE R-83 for light-duty vehicle emissions type approval in relevant markets
Chemical compliance expectations for export, including REACH (EC) No 1907/2006 for substances in supplied articles
This check matters when one distributor supplies several repair channels. The same nameplate may use multiple engine variants. The same engine family may use different piston and ring combinations by year, compression ratio, emissions level, or market.
A useful PO line is specific: engine code, bore, oversize, ring heights, oil-ring type, quantity per engine, packaging quantity, and requested documentation. For range review, buyers can compare ring sets and adjacent engine parts in our catalog and the engine component range at /products/engine-components.html.
Measurement Deep-Dive: The Numbers That Decide Fit
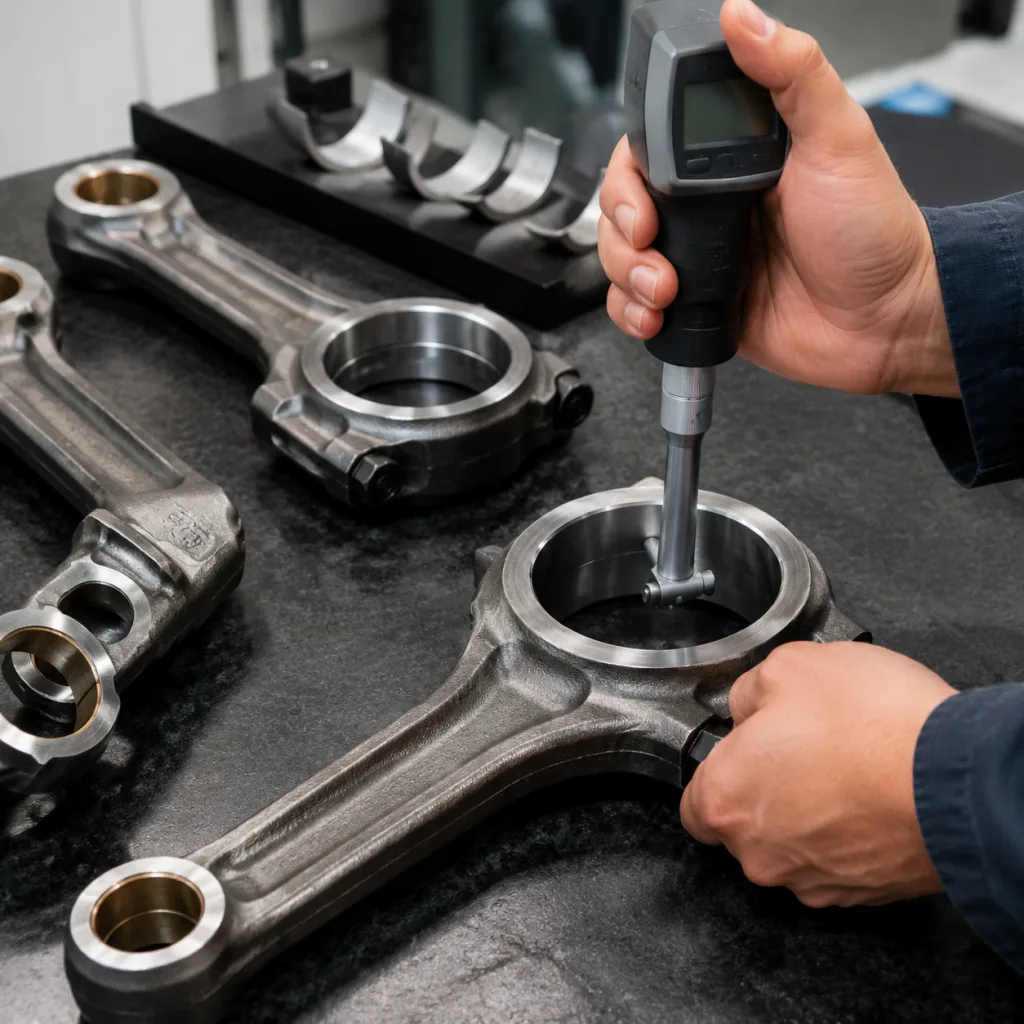
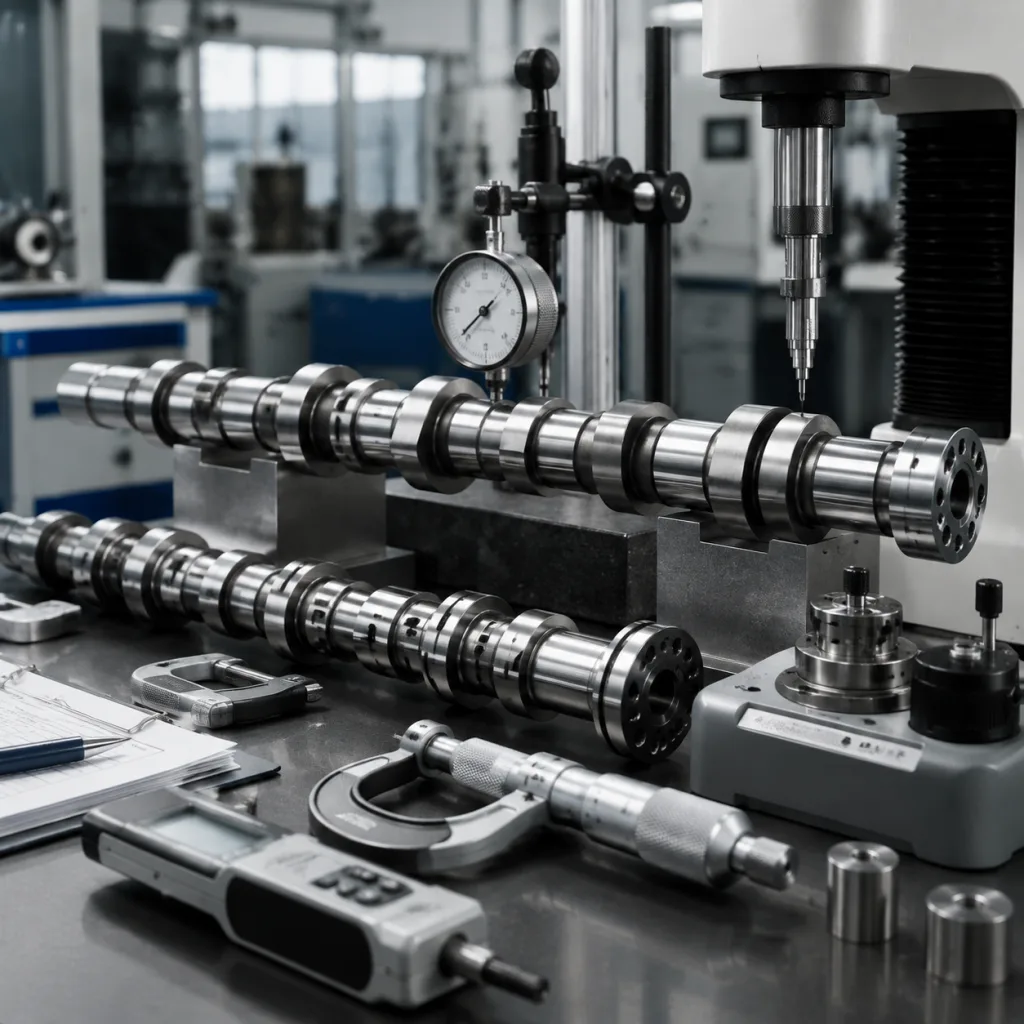
A professional ring replacement is decided by gauges, not by feel. The minimum bench setup includes a dial or digital bore gauge readable to 0.01 mm, an outside micrometer matched to the bore range, feeler gauges in 0.02–0.05 mm increments, a piston ring expander, ring compressor, groove cleaner, torque wrench, and a calibrated straightedge or surface plate where applicable.
Temperature matters. Small dimensional errors become large problems at operating temperature. For repeatable checks, keep piston, ring, gauge, and cylinder close to 20 °C. Zero the bore gauge against a micrometer before each bore group.
Check point
Tool
What it decides
Reject condition
Cylinder bore diameter
Bore gauge and micrometer
Confirms standard or oversize repair; measure near top, middle, and bottom in thrust and non-thrust directions
Diameter, taper, or out-of-round beyond engine service limit; many light engines need correction when taper/out-of-round exceeds about 0.03–0.08 mm, but service data prevails
Ring end gap
Feeler gauge with ring squared in bore
Prevents end butting, blow-by, and poor sealing
Gap below or above service data; many gasoline rings fall around 0.20–0.50 mm and diesels around 0.30–0.70 mm depending on bore and design
Ring side clearance
Feeler gauge
Confirms fit in the piston groove
Tight fit, ring rocking, or excess clearance; typical compression-ring side clearance may be roughly 0.03–0.10 mm, but groove limits control
Ring back clearance
Micrometer/depth measurement
Confirms radial clearance behind the ring
Ring bottoms in the groove or cannot move freely; radial wall must be less than groove depth by the specified clearance
Groove condition
Visual and gauge check
Detects carbon, wear, burrs, and distortion
Worn, stepped, cracked, burred, collapsed, or distorted groove; blocked oil-drain holes behind the oil ring are unacceptable
Ring orientation
Visual marking and profile check
Confirms correct gas sealing and oil scraping
TOP mark, dot, bevel, taper, or Napier profile installed incorrectly; unclear markings require drawing confirmation
</tr></thead><tbody> </tbody></table>Use the engine manufacturer’s limits. Do not copy one end-gap rule across all engines. A common field estimate is 0.0035–0.0050 in per inch of bore for some naturally aspirated gasoline top rings, with larger clearances for boosted, high-temperature, or heavy-duty applications. Treat that only as a screening reference. It does not override the ring maker’s specification.
Turbocharged gasoline, naturally aspirated gasoline, light diesel, heavy-duty diesel, and alternative-fuel engines may use different materials, coatings, face profiles, and gap strategies. If a repair chain standardises work instructions, tie the limits to engine family, bore diameter, repair size, ring design, and expected combustion temperature.
For supplier approval, request evidence that the manufacturer controls free gap, tangential tension, axial height, radial wall, coating adhesion, face profile, side face condition, and surface finish. A practical incoming inspection plan for bulk buyers is AQL-based sampling for dimensions and visual defects, with 100% verification of labels, part number, repair size, and quantity per set. Driventus manages these controls within its documented quality system.
Bench Sequence: How to Replace Piston Rings Without Guesswork
This sequence assumes the engine has been removed or opened according to the relevant service manual. Vehicle-specific torque sequences, fastener replacement rules, cleanliness requirements, and safety instructions still control the job.
Before assembly, prepare a tray by cylinder number. Print or load torque data. Record the ring batch number, piston number, bore readings, and measured gaps.
1. Remove the cylinder head, sump, and connecting rod caps as specified. Mark caps and rods so they return to the same cylinder and orientation. Mixed rod caps can create bearing alignment problems. Replace torque-to-yield bolts where specified and protect bearing shells from dirt. 2. Push the piston and rod assembly out of the bore. Protect the crankshaft journal with hose or caps over rod bolts. Do not strike the rod. If a ridge is present at the top of the bore, handle it according to the service procedure before forcing the piston out. 3. Remove old rings with a ring expander. Do not spiral heavy compression rings off the piston. That can score the groove, distort the ring land, or break a brittle used ring into the groove. Keep old rings temporarily for comparison of profile and orientation. 4. Clean piston grooves fully. Use a groove-cleaning tool that matches groove width. Remove carbon without cutting into aluminium or cast material. Make sure oil drain holes behind the oil control ring are open. A broken ring should not be used as an uncontrolled scraper unless its edges are dressed and the technician understands the gouging risk. 5. Inspect the piston. Reject pistons with cracked lands, collapsed skirts, severe scuffing, damaged pin bores, heat damage, distorted grooves, or groove dimensions outside service limits. Measure groove width at several positions; a new ring cannot seal correctly in a bell-mouthed or stepped groove. 6. Check cylinder bore condition. Measure diameter, taper, and out-of-round at minimum at 10–15 mm below the top ring reversal area, mid-stroke, and near the lower ring travel limit, in thrust and non-thrust axes. If the bore is glazed, scored, polished, or outside specification, hone, bore, sleeve, or select the correct oversize piston before ring installation. 7. Confirm the new ring set. Compare the new rings with application data and the old ring pack. Check quantity, axial height, radial wall, face profile, coating, oil-ring type, and orientation marks before fitting. Measure at least one set per batch for incoming control, and more if packaging is mixed or previous claims exist. 8. File or select rings only if the design allows it. Some rings are supplied pre-gapped for a defined bore and should not be modified unless the service instruction permits it. If filing is allowed, remove material carefully using a ring filer, keep the end square, approach the target gap gradually, and deburr without damaging the coating or face. 9. Check ring end gap in the bore. Insert the ring into the cylinder and square it with the piston crown, normally 15–25 mm below the deck or at the specified depth. Measure the gap with a feeler gauge without forcing the ring open. Repeat for each cylinder when bore wear or machining variation is possible. Record each top, second, and oil rail gap separately. 10. Check side clearance in the piston groove. The ring must move freely without binding, yet must not have excessive clearance. A new ring in a worn groove can still cause blow-by and oil consumption. Confirm that the oil ring expander sits flat and that rails rotate freely after installation. 11. Install rings in the correct order. Fit oil control components first, then the second ring, then the top compression ring. Observe TOP, dot, bevel, taper, Napier, hook-groove, or barrel-face orientation requirements. Never expand a ring more than necessary to pass over the piston diameter. 12. Stagger ring gaps. Follow the engine service manual. A common starting pattern is top ring away from the thrust face, second ring roughly 120–180 degrees from the top ring, and oil rail gaps separated from the expander joint. Still, the service manual controls. Avoid aligning gaps with each other or with the piston pin axis unless specified. 13. Lubricate the bore and ring pack. Use the specified assembly lubricant or engine oil. Excessive oil can affect initial seating on some engines; dry assembly can damage coated surfaces. Many workshops use a light oil film on the bore and rings, then rotate the crankshaft to confirm smooth movement. 14. Compress and install the piston. Use a clean, correctly sized tapered or band-style ring compressor. The piston should enter smoothly with light, controlled pressure from a hammer handle or press tool. Sudden resistance means stop. Check for a misaligned ring, poor compressor position, incorrect ring placement, or piston orientation error. 15. Torque fasteners to specification. Rod bolts, head bolts, and other torque-to-yield parts may require replacement. Follow angle-tightening and bearing lubrication instructions exactly. Verify rod side clearance and crankshaft rotation after each piston is installed. 16. Prime lubrication and follow break-in procedure. Disable fuel or ignition as appropriate and build oil pressure before first start where the service procedure allows. Initial running should verify oil pressure, crankcase pressure, exhaust smoke, abnormal noise, coolant stability, and diagnostic trouble codes. Avoid long idle-only break-in unless the engine builder specifies it; ring seating often requires controlled load and temperature cycles.
A disciplined sequence prevents the common rebuild failures: broken rings, upside-down installation, poor gap control, contaminated assembly, and new rings fitted into an unserviceable bore.
Failure Modes: What Went Wrong When New Rings Fail Early
Most early piston ring failures are not mysterious. They trace back to missed measurements, poor surface preparation, wrong part selection, or contamination. A new ring set cannot correct a distorted cylinder, overheated piston, blocked oil return path, poor air filtration, or fuel wash from injector problems.
In claim reviews, the failed ring alone rarely tells the full story. Bore condition, piston groove data, oil consumption history, air-intake condition, and installation records matter more.
Key failure modes include:
Insufficient end gap: Ring ends butt under heat, causing bore scoring, broken lands, ring distortion, or seizure. Risk rises in turbocharged, LPG/CNG, towing, or high-exhaust-temperature engines when correct data is not checked.
Excessive end gap: Compression loss, high blow-by, poor starting, increased crankcase pressure, and oil carryover. Large gaps may indicate worn bores, wrong repair size, incorrect ring set, or over-filing.
Incorrect ring orientation: A taper, Napier, stepped, hook-groove, or barrel-faced ring may fail to seal or scrape oil if installed upside down. If TOP marks are absent, confirm the profile against a drawing or supplier instruction.
Unclean grooves: Carbon behind the ring blocks free movement. A correct ring then behaves like a stuck ring. Blocked oil drain holes often cause immediate oil consumption after rebuild.
Poor bore preparation: Rings will not seat in a glazed, polished, badly scratched, or poorly honed cylinder. Honed finish must match the ring material. Many modern moly or nitrided rings require a controlled plateau finish, not a rough abrasive crosshatch.
Wrong material or coating: High-load, turbocharged, diesel, or high-temperature applications may require steel, ductile iron, nitrided, molybdenum, PVD, or another specified design. Substitution should be approved by engineering, not selected by price alone.
Incorrect oil control ring assembly: Expander overlap, rail misplacement, rail gap alignment, wrong expander direction, or blocked drain holes can cause immediate oil consumption. Three-piece oil rings should be checked visually around the full circumference before piston insertion.
Contaminated assembly: Abrasive particles, blasting residue, lint, honing grit, and old gasket debris accelerate wear during the first running hours. After honing, clean bores until a white lint-free cloth with light oil shows no grey residue.
Root cause ignored: Overheating, detonation, injector leakage, EGR contamination, poor filtration, turbocharger oil leakage, or crankcase ventilation faults can damage a new ring set quickly.
For multi-location repair chains, standard inspection sheets pay for themselves. Require technicians to record bore size, taper and out-of-round where applicable, end gap for every ring, side clearance, piston condition, groove condition, final ring orientation, honing method, lubricant used, and batch number. This data is also useful for supplier warranty investigation. A claim file without bore measurements and installation data usually cannot separate product defect from application, machining, or assembly error.
For programs requiring private-label packaging, controlled drawings, or non-standard ring materials, Driventus can support custom manufacturing after technical review.
Buyer’s Specification: What Bulk Ring Orders Must State
A purchasing specification should not stop at engine coverage. It should define measurable characteristics, application boundaries, packaging requirements, and batch documentation. This is especially important for EU, UK, North American, Australian, and Brazilian aftermarket channels, where importers must manage consistency across warehouses, installer groups, and private-label programs.
For a distributor, risk is not just unit price. It is wrong-fit returns, installer claims, repacking, delayed launches, and incomplete repair-size coverage.
Recommended purchasing specification:
Application list with engine code, bore size, fuel type, production range, and repair size; include STD, +0.25, +0.50, +0.75, and +1.00 mm only where validated for that engine
Ring set configuration and quantity per engine, including whether the oil ring is one-piece, two-piece, or three-piece
Axial height and radial wall for each ring, with tolerances agreed by drawing; common aftermarket control may require inspection to 0.01 mm resolution for critical dimensions
End-gap target or controlled range where agreed by drawing or technical file; state whether rings are pre-gapped, file-fit, or require workshop verification only
Free gap and tangential tension requirement, including test method, fixture diameter, and acceptable range
Ring face profile, side face finish, and coating specification, including moly inlay, chrome, nitriding, phosphate, PVD, or other surface treatment where used
Base material grade and heat treatment condition, such as grey cast iron, ductile iron, alloy cast iron, or steel
Oil control ring design, including expander and rail configuration where applicable
Marking requirement for orientation, part identification, repair size, and traceability; markings must remain legible after corrosion protection and normal handling
Packaging format, corrosion protection, carton strength, barcode format, label language, and set-level separation to prevent mixed rings
Batch inspection report, certificate of conformity, and agreed sampling plan; for larger programs, define AQL, retained samples, and response time for nonconformity review
Quality management references: IATF 16949:2016 and ISO 9001:2015
Chemical and export compliance review, including REACH (EC) No 1907/2006 where relevant
MOQ, price, and lead time should follow application complexity. For catalogue items already in production, buyers commonly run sample or pilot orders first, then move to carton or pallet quantities after fitment validation. For custom dimensions, special coatings, private-label packaging, or new repair sizes, tooling review, drawing confirmation, trial production, and packaging artwork can add several weeks.
Unit price is usually affected by material, coating, ring diameter, thickness, tension requirement, set complexity, inspection level, packaging, and annual volume. A low-volume special ring with PVD or nitriding will not price like a high-volume cast-iron standard set. A practical RFQ should state annual forecast, first-order quantity, target markets, packaging type, documentation required, and whether PPAP-style documents or retained samples are needed.
Driventus does not claim approval or endorsement by any vehicle manufacturer. Where OE references appear in buyer data, they are for identification and fitment mapping only, for example OE 06A107065 when provided by the customer’s cross-reference file. Driventus is an independent aftermarket manufacturer; brand names are referenced for fitment only.
If your team is consolidating piston rings with pistons, gaskets, bearings, water pumps, or other engine components, a combined sourcing review can reduce duplicated audits, packaging work, labelling changes, and supplier-development time.
Post-Install Q&A: Is the Ring Job Actually Finished?
After assembly, verification is part of the replacement process. It is not a courtesy check.
What should be checked first after start-up? Oil pressure, abnormal noise, crankcase pressure, exhaust smoke, coolant stability, and leaks. If the dashboard oil-pressure display is only a switch or calculated value, use a mechanical gauge where diagnosis requires it.
Should compression or leak-down be tested? Yes, where practical. Compression or leak-down testing helps confirm that the repair has not introduced a sealing issue. Compare cylinders, not just one absolute number. Many workshops treat more than about 10–15% cylinder-to-cylinder variation as a trigger for diagnosis, subject to the engine maker’s limits.
Can crankcase ventilation make good rings look bad? Yes. A blocked PCV valve, failed separator, restricted hose, or abnormal breather flow can increase oil carryover and crankcase pressure. Check the ventilation system before blaming the ring set.
What smoke patterns matter? Blue smoke during warm-up, acceleration, deceleration, or idle after heat soak should be recorded. Blue smoke on overrun may also involve valve guides or turbocharger seals, not only piston rings.
What data should the workshop record?
Oil pressure at idle and operating temperature
Abnormal crankcase pressure, breather flow, or oil mist from the ventilation system
Exhaust smoke during warm-up, acceleration, deceleration, and idle after heat soak
Misfire, unstable idle, compression imbalance, leak-down percentage, or abnormal scan-tool data where applicable
External oil, coolant, or fuel leaks after heat cycling and after the first road test
Unusual piston slap, bearing noise, ring noise, or knocking under load; stop the engine if noise changes rapidly with load or oil pressure
Customer, fleet, or workshop break-in instructions supplied with the repair, including oil grade, first oil-change interval, load limits, and idle restrictions
For distribution businesses, field feedback should be linked to batch number and application. When repeated claims appear in one engine family, compare workshop records before concluding that the ring set is at fault. Cylinder preparation, piston groove wear, filtration quality, injector condition, overheating history, PCV function, turbocharger condition, oil specification, and break-in procedure can all affect ring seating and service life.
A useful warranty review package includes invoice, part number, batch code, engine code, repair size, bore measurements, end-gap readings, photos of ring orientation, oil-control-ring assembly photos if available, and first-run test data.
Frequently asked questions
Only if the bore remains within the engine service limits for diameter, taper, out-of-round, surface condition, and finish. A glazed, scored, polished, or distorted bore will prevent correct seating. Measure at several heights and two axes first, then decide whether honing, boring, sleeving, or piston oversize selection is required.
Specify engine code, bore size, repair size, ring pack layout, material, coating, axial height, radial wall, face profile, tension requirements, end-gap control method, packaging, and documentation. Request batch traceability and quality management evidence under IATF 16949:2016 and ISO 9001:2015.
Yes, Driventus can review drawings, samples, application data, and performance requirements for B2B programmes. Custom work may include material changes, coating selection, dimensional control plans, private-label packaging, and controlled inspection plans, subject to technical feasibility, validation requirements, MOQ, and agreed order volume.
For piston ring sourcing, cross-reference review, or a controlled quotation pack, contact Driventus to discuss application coverage, repair sizes, documentation, inspection requirements, MOQ, pricing logic, and lead-time planning. You can [request a quote](/contact.html).