Replacing an EGR valve is a controlled service task, not a simple swap. For fleet workshops, repair chains, and parts buyers, the biggest risk is fitment mismatch: connector keying, flange geometry, actuator travel, cooling layout, and calibration strategy all need to align with the application before installation starts. A correct replacement reduces repeat comebacks and helps prevent DTC recurrence after installation. Driventus is an independent aftermarket manufacturer; brand names are referenced for fitment only. This guide explains how to replace an EGR valve with practical checks, quantified inspection points, and sourcing criteria buyers can use. It also highlights the standards and quality controls that matter for purchased parts, including IATF 16949:2016, ISO 9001:2015, and relevant emissions and material compliance requirements such as REACH (EC) No 1907/2006.
First Check the Fit, Not the Bolts
Before any teardown, confirm that the part is actually the right one for the engine and emissions package. The most expensive mistake is fitting a valve that looks close but differs in connector keying, mounting geometry, or control strategy.
Verify the OE reference, VIN application, engine code, and emissions family.
Inspect the electrical connector for pin count, keying, seal condition, and latch style.
Confirm whether the unit is vacuum-actuated, electric, or integrated with a cooler.
Record connector voltage, supply continuity, and ground integrity before removal.
Check gasket count, fastener access, bracket interference, and hose orientation.
Capture DTCs and freeze-frame data before clearing anything.
If the vehicle has repeat flow faults, inspect the intake passages and cooler first. A blocked passage can make a good replacement look bad. For procurement, the rule is simple: if connector, mounting, and control type do not match, do not treat the part as equivalent until drawings or samples confirm it. For multi-application buying, cross-reference fitment against our catalog and the engine-family pages when needed.
What to Have on the Bench
A clean replacement depends on basic control of tools, seals, and measurement. The goal is not just to install the valve, but to avoid introducing a second problem during the job.
Item
Purpose
New EGR valve
OE-equivalent replacement
New gaskets or seals
Leak prevention after removal
Torque wrench
Correct clamp load
Scan tool
DTC read, clear, and basic adaptation
Brake cleaner or approved solvent
Carbon removal on mating faces
Soft brush and lint-free cloth
Cleaning without surface damage
Multimeter
Power and signal checks if required
Feeler gauge or straightedge
Quick flatness and seating check
</tr></thead><tbody> </tbody></table>Check the replacement against the original in these areas:
Bolt-hole spacing within ±0.3 mm for sampled first article checks unless the vehicle drawing specifies tighter control.
Flange flatness within 0.10 mm across the sealing face, or per drawing requirement.
Actuator type, connector pinout, and locking tab orientation.
Valve stem travel and return action; verify smooth movement with no sticking and full return under spring or commanded control.
Cooler inlet and outlet orientation, where applicable.
Gasket thickness and bead position matched to the OE sealing stack.
For sourcing teams, this is where the quality system matters most. Conformity to IATF 16949:2016 and ISO 9001:2015 supports repeatable incoming inspection, dimensional control, and traceable nonconformance handling.
Step-by-Step Replacement Sequence
Use a controlled sequence so the job stays repeatable across bays and depots. If the model has a cooler or rigid pipework, support adjacent lines before loosening fasteners.
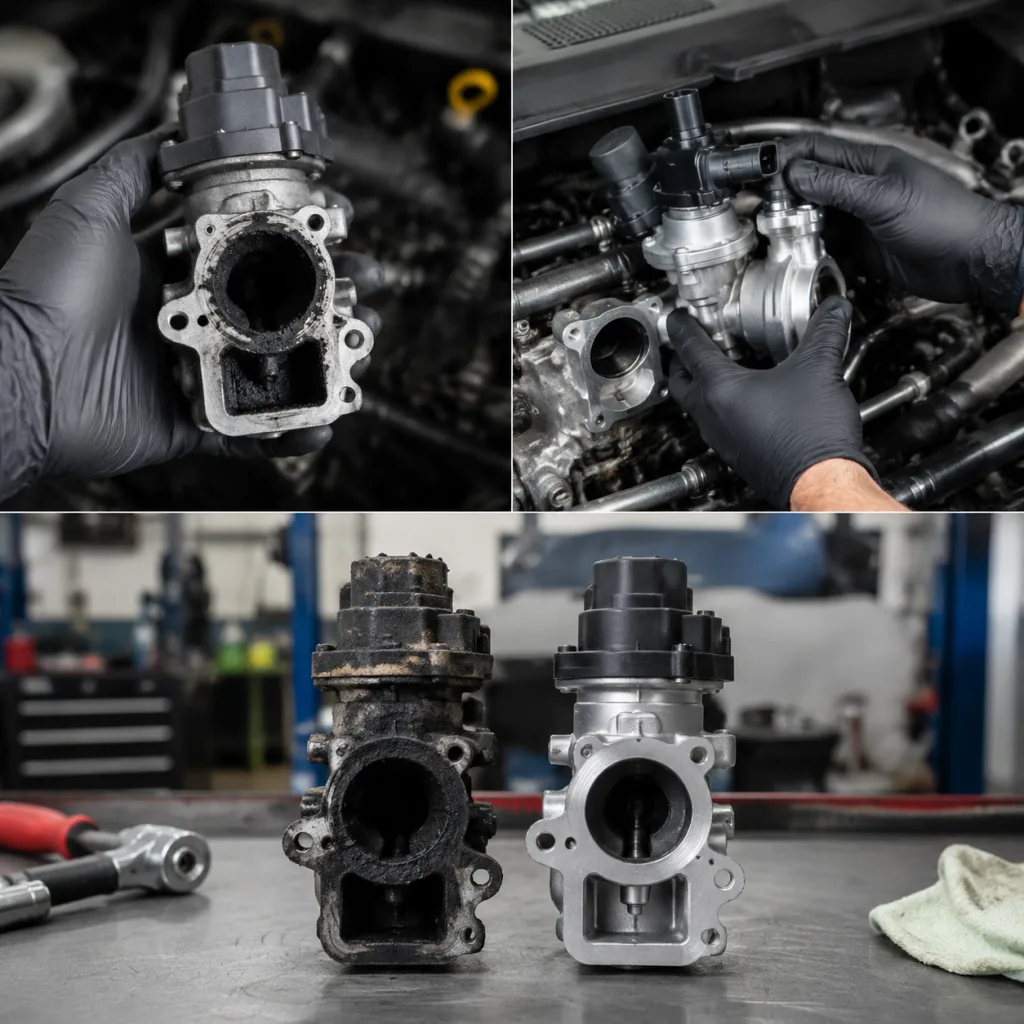
1. Disconnect the battery if the manufacturer procedure requires it and wait at least 3 minutes for module sleep where specified. 2. Remove the engine cover and intake ducting needed for access. 3. Unplug the electrical connector and release vacuum lines, if present, without damaging the seals. 4. Mark hose and bracket locations so reassembly returns to the original orientation. 5. Unbolt the EGR valve and separate it from the manifold or cooler. 6. Remove old gasket material from both mating surfaces; do not scratch the sealing face. 7. Inspect the port for heavy soot, cracks, warping, or coolant residue. 8. Measure flange flatness and compare the replacement body to the OE part before install. 9. Install the new gasket and position the replacement valve. 10. Tighten fasteners to the vehicle specification in the correct sequence; where no spec is supplied with the OE data, use the engine maker’s published torque only. 11. Reconnect hoses and wiring, then secure clips and brackets. 12. Clear codes and run the required adaptation or relearn routine.
Typical EGR fastener torque is often in the 8–25 N·m range depending on thread size and housing material, but the vehicle service manual always overrides that range. For aluminium castings, over-torque risks thread pull-out and exhaust leakage; under-torque risks soot leakage and repeat labor. If the replacement is part of a broader engine-control service programme, custom manufacturing is relevant for non-standard brackets, connector variants, or packaging requirements. Driventus can support OE-equivalent and application-specific production without claiming vehicle-maker endorsement.
Failure Modes After Installation
A valve can be bolted on correctly and still fail the job. The common issues usually come from flow restriction, sealing loss, or a control mismatch rather than the part itself.
Start the engine and check for exhaust leaks around the flange and cooler joints.
Confirm stable idle and no immediate DTC return.
Use live data to compare commanded and actual EGR position, where available.
Verify idle quality and note manifold pressure response during a 2,000–3,000 rpm snap test.
Run a road test or load test that brings the valve into operating range.
Recheck fastener torque after one complete heat cycle if the OEM procedure specifies it.
A practical acceptance target is no visible leak, no abnormal ticking at the flange, and no recurring fault after one warm-up and one road cycle. For compliance-sensitive programmes, document replacement traceability, batch identification, and inspection records. Material and chemical controls should align with REACH (EC) No 1907/2006, and emission-related test evidence should be aligned with the relevant vehicle application requirements, such as ECE R-83 where applicable. For aftermarket durability verification, common lab practices include thermal cycling from about -40°C to 850°C exhaust-side exposure, salt spray to 96 hours or more for bracketed assemblies, and functional cycling to a defined duty profile.
How Buyers Should Compare Parts
Procurement teams should treat the valve as a controlled component, not a commodity. The lowest unit price does not matter if the part returns with flow errors, connector mismatch, or sealing leakage.
Ask for OE cross-reference confirmation before order release.
Request dimensional drawings, connector pinout, and sealing-face details for new applications.
Confirm packaging, labelling, and traceability expectations.
Review durability testing data for thermal and soot-exposed duty cycles.
Align MOQ and lead time with service demand, not just annual forecast.
Build a three-point purchasing rule: sample approval, pilot batch, then volume release.
For planning, a common sourcing model is MOQ 50–100 units for catalog applications, with pilot lots of 5–10 units for first-fit validation and 10–20 units for engineering sign-off. Standard lead time for stocked applications is often 7–15 days, while new tooling or application-specific variants may require 30–45 days depending on material and test status. In price negotiations, unit cost should be reviewed alongside defect allowance, freight terms, and the cost of a comeback; a slightly higher part price can still be lower total cost if it cuts warranty returns and workshop rework.
Driventus supplies EGR valves and related engine components for distributors, OEM/Tier-1 programmes, and repair networks. Published standards matter because they support repeatable production, documentation, and traceability. If you need a fitment review or private-label programme, use our catalog, review the quality system, or explore custom manufacturing for application-specific requirements. For direct sourcing support, request a quote.
Frequently asked questions
Match the OE reference, connector, flange, actuator type, cooling layout, and fastener pattern. If any of those differ, verify with drawings or samples before ordering at volume. A practical check is connector pin count, mounting-hole spacing within about ±0.3 mm, and sealing-face flatness within 0.10 mm unless the OE drawing calls for tighter control.
Often yes. Many applications need code clearing, adaptation, or a relearn procedure so the ECU recognizes the new valve correctly. A scan tool also lets you confirm commanded versus actual position and check for immediate return faults.
Yes. New gaskets or seals are standard practice. Reusing old sealing parts increases the risk of exhaust leakage and repeat labor. If the valve uses a cooler or rigid pipework, inspect the sealing stack and bracket alignment before final torque.
If you are sourcing replacement valves for a specific vehicle family or need OE-equivalent validation, speak with our team and we will review fitment and supply options at /contact.html.