Oil leak diagnosis oil cooler work is a source-confirmation job, not a parts-guessing job. The cooler core, seal pack, adapter plate, oil filter base, threaded fittings, hose crimps, and nearby engine gaskets can all put oil in the same visible area. The wettest point is often just the lowest point. Oil can travel 100-300 mm along the block, wick around a hose, collect on a shield, and drip from a bracket that has not failed.
For procurement teams, distributors, and workshop buyers, the useful question is narrow: which interface failed, and what replacement will fit without creating a comeback? Answering that means checking port orientation, seal design, mounting geometry, material condition, production split, and supplier control over dimensions such as bolt spacing, port depth, flange flatness, seal groove width, and seal compression range.
Driventus is an independent aftermarket manufacturer; brand names are referenced for fitment only. We manufacture engine and powertrain components for B2B buyers under controlled processes aligned with IATF 16949:2016 and ISO 9001:2015, with documentation support for sourcing teams. This article treats oil cooler leakage as a diagnostic and sourcing decision: identify the leak path, separate seal failure from cooler failure, validate the part, and decide whether resealing or full assembly replacement is the lower-risk repair.
Start With The Leak Pattern, Not The Part Number
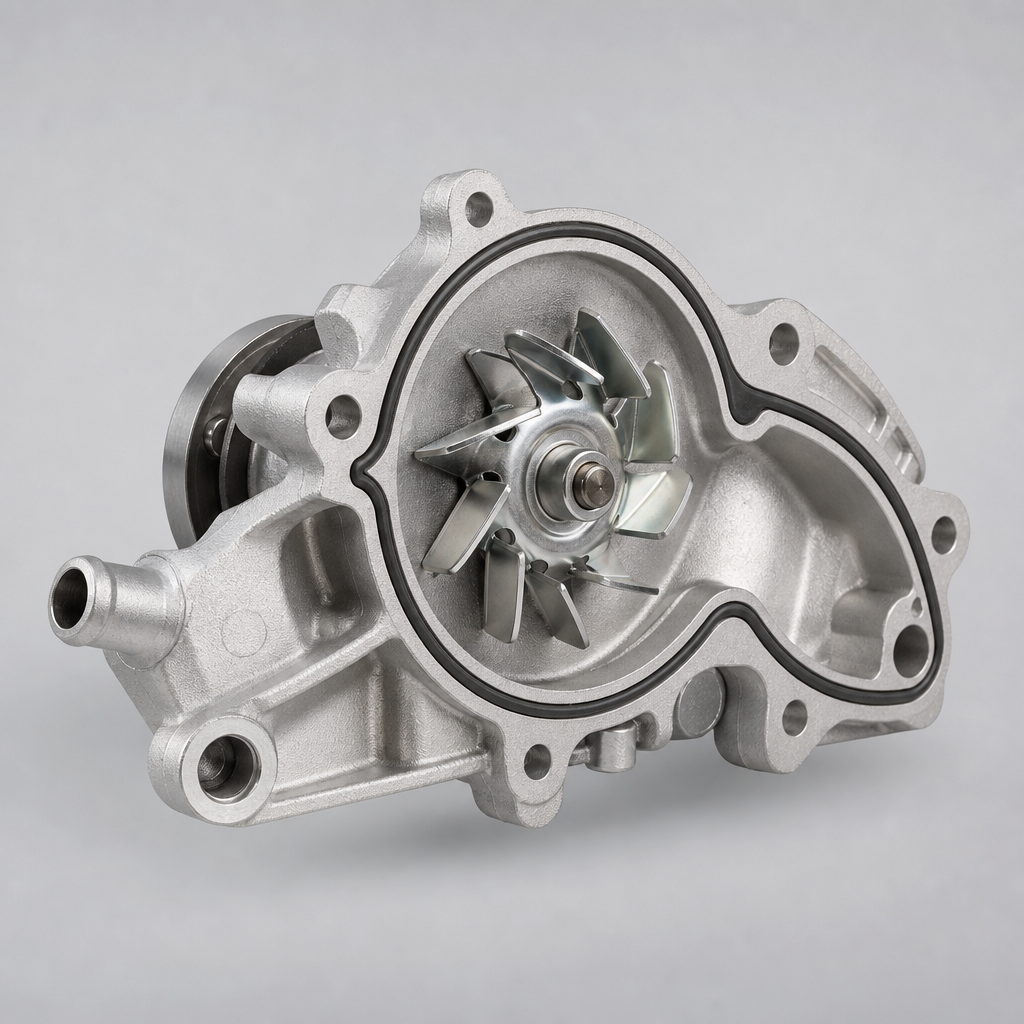
An oil cooler leak may show as a wet film around the cooler flange, oil filter base, adapter plate, hose connection, crimp sleeve, or threaded port. On oil-to-water coolers, residue may also gather near coolant hose connections or beneath the cooler stack. On remote oil-to-oil coolers, the first visible clue can be oil on a line crimp, mounting bracket, undertray, or lower shield instead of the cooler body.
Do not call the cooler failed until the area has been cleaned and rechecked under operating conditions. Road grime, old service residue, and airflow through the engine bay create false trails. A drip at the bottom of the assembly may come from a valve cover, filter housing, pressure switch, turbo oil feed, or gasket above the cooler. Establish a clean baseline. After degreasing, a fresh external leak often returns within 5-15 minutes of warm idle, or after a 5-10 km road test if it appears only under load.
Look for evidence that repeats:
Fresh oil at the cooler-to-block or cooler-to-filter-base flange
Oil tracking from a port seal, banjo fitting, quick connector, or hose connection
Wetness that returns shortly after cleaning and warm idle testing
Oil spray near a pressurised line or fitting, often worse above 2,000 rpm
Burnt oil smell when residue reaches an exhaust heat shield or turbo area
Low oil level without a clear drain plug, pan gasket, or rear main seal leak
If the engine oil looks milky, the coolant reservoir has an oily film, or cooling system pressure changes unexpectedly, treat the case as possible internal cooler failure. Test both circuits before approving parts. A gasket will not repair a cracked plate stack or an internal brazing leak.
Failure Modes That Mislead Technicians
Oil cooler systems leak in familiar places, but the cause changes with cooler design, service history, tightening method, corrosion exposure, vibration, and thermal load. A cooler with 80,000-150,000 km of heat cycles may have hardened seals while the metal body is still serviceable. A newer assembly may leak because an O-ring was cut, the thread was crossed, the fitting was over-tightened, or the replacement seal kit had the wrong cross-section.
Failure point
Typical cause
Visible sign
Action
Cooler gasket
Age, heat cycling, improper torque, reused seal, dirty land
Wet flange edge or seep line around the mounting face
Replace gasket, clean the land, check flatness and torque sequence
O-rings
Hardening, chemical attack, dry installation, wrong profile or Shore hardness
Seep at ports or oil around the seal groove
Replace seals, verify groove width, groove depth, and lubrication method
Inspect threads and reinstall with specified torque and sealing method
Hose or crimp joint
Chafing, heat ageing, vibration, poor routing
Oil film along line, wet crimp sleeve, spray under pressure
Replace hose or cooler line assembly and correct routing clearance
Mounting surface
Corrosion, casting porosity, warpage, old gasket residue
Recurrent seep after reseal
Inspect for distortion, pitting, and surface damage before reuse
</tr></thead><tbody> </tbody></table>One common trap is the shared stack. Some applications mount the cooler with the oil filter base or adapter housing, and a gasket behind the base can make the exchanger look guilty. Inspect the full stack: block face, filter stand, adapter, cooler, lines, and fittings. The failed part is the first fresh wet point, not the part nearest the final drip.
A Workshop Sequence That Finds The Source
Begin with a clean engine. Degrease the suspected area, removing old oil from the cooler, filter base, block face, lines, and nearby shields. Then run the engine to operating temperature and inspect under bright light. If available, add UV dye to the engine oil at the dye maker's stated dose, usually one small bottle for 4-6 litres of oil, and use a UV lamp after a short road test. Dye is useful when oil spreads across brackets or appears only after heat soak.
1. Clean the cooler, filter base, hose connections, adapter plate, and surrounding block face. 2. Confirm the oil level and record the baseline before testing. 3. Check coolant condition if the cooler is oil-to-water or shares a coolant circuit. 4. Run the engine at idle, then at 2,000-2,500 rpm for 3-5 minutes. 5. Inspect the highest fresh wet point first; gravity and airflow often move oil lower than the source. 6. Check flange bolts for loosening, but do not retorque blindly without the service procedure. 7. Examine sealing ring seats, port faces, hose crimps, and casting areas for cracks, pitting, or scoring. 8. Inspect hoses and lines for chafing, swelling, split crimp joints, and contact with brackets; keep at least 10-15 mm clearance from sharp edges where possible. 9. If oil and coolant are mixing, pressure-test both circuits separately and confirm whether the cooler is the transfer path. 10. Recheck after shutdown for 10-20 minutes if the customer complaint mentions leaks after parking.
Heat can change the result. A seal that looks dry when cold may open as thermal expansion shifts interface load, especially on a distorted flange or hardened seal. Repeat the check hot and document the first return point of oil with photos before parts are ordered.
Seal Set Or Complete Cooler: The Decision Gate
Do not replace a complete cooler when a serviceable seal set is the only failed item and the base surfaces are within tolerance. Also do not reseal a damaged cooler because the gasket is cheaper. The decision turns on body condition, sealing land quality, face flatness, thread integrity, port alignment, and whether oil and coolant have crossed circuits.
Use these criteria
Replace the gasket or O-rings if the cooler body is intact, the sealing lands are clean, and the leak is clearly at the seal interface
Replace the full cooler if there is visible cracking, corrosion pitting deeper than light staining, damaged ports, internal leakage, or repeated leakage after a correct reseal
Replace the mating housing if the face is warped, eroded, corroded, or the threaded ports are damaged
Replace hoses or lines if seepage begins at a crimp, bend, abrasion point, swivel fitting, or heat-hardened rubber section
Replace both mating parts if a failed seal or cracked wall has allowed oil and coolant cross-contamination
Flatness is not a detail. As a practical workshop screen, use a straightedge and feeler gauge. A sealing face showing more than about 0.05-0.10 mm variation across the gasket land should not be treated as a simple reseal unless the vehicle maker gives a higher limit. A new seal cannot compensate for a distorted flange, embedded old gasket material, deep corrosion, or a gouged sealing land. Over-tightening can also deform housings and create a return leak.
For procurement teams, this is where fitment confirmation and dimensional control prevent avoidable returns. The replacement part should match the mounting face, port depth, bolt spacing, seal compression range, and hose orientation, not just the catalogue headline. For production sourcing, ask which dimensions are controlled on every batch and which are checked by sampling, such as port centre distance, thread gauge, gasket land flatness, and leak-test result.
The Buyer Checklist Before Releasing An Order
When sourcing replacement oil coolers, buyers should check fitment data, port orientation, seal type, thermal package compatibility, and installation hardware. A correct catalogue number is not enough if the mounting pattern, bypass arrangement, sensor provision, or hose routing changes by engine code, production year, or market region.
Review these points before ordering:
Engine code, model year, market region, and application split
OE cross-reference, such as OE 06A107065 when applicable
Cooler type: oil-to-oil, oil-to-water, stacked-plate, plate-fin, or remote mounted
Seal kit inclusion, seal cross-section, and seal material compatibility such as NBR, HNBR, FKM, or EPDM where coolant is present
Thread type, port size, port depth, seat angle, and fitting style
Mounting face geometry, bolt spacing, locating pins, and gasket land width
Sensor ports, bypass valve arrangement, thermostat provision, and filter-base interface
Pressure and temperature exposure in service, including cold-start oil viscosity and hot idle conditions
Packaging protection for sealing faces, fins, threads, and open ports
For B2B supply, dimensional match should be supported by drawings, inspection records, or approved samples, especially when serving mixed fleets across Europe, North America, and Brazil. For a new line, buyers commonly approve 3-10 samples first, then release a trial order once fitment, leak testing, packaging, and label data are confirmed. Regional catalogues can use different references for visually similar parts, so confirm the physical interface before bulk ordering.
If the buyer needs a controlled variation for a platform programme, use custom manufacturing rather than forcing a near-match part into service. A near-match cooler may install on the bench and still fail once hose routing, heat load, oil pressure, and engine movement are present.
Specification Deep-Dive: Tests Worth Asking For
Oil cooler validation is not only about fit. The part must hold pressure, transfer heat, resist corrosion, tolerate vibration, and remain compatible with engine oil, coolant, seal materials, and cleaning chemicals used in service. A sourcing decision should therefore review both dimensional evidence and process controls.
Relevant published standards and regulations may include IATF 16949:2016, ISO 9001:2015, REACH (EC) No 1907/2006 for material compliance, and application-specific durability methods used by OEM or Tier-1 buyers. Depending on the programme, buyers may also request burst testing, leak testing, thermal cycling, salt spray exposure, vibration testing, cleanliness checks, and material declarations. Practical RFQ language should define the requested proof: for example, 100% air decay or helium leak testing at an agreed pressure, sample burst testing at a defined safety factor, and inspection records for critical dimensions.
For adjacent thermal-system validation, buyers often reference salt spray, vibration, and thermal cycling requirements from their own specification packs. Where the cooler interfaces with emissions-related packaging or underbody thermal management, the installer must also consider vehicle-specific service limits, hose material compatibility, and clearance to exhaust or moving components. As a procurement baseline, ask the supplier to state operating pressure range, test pressure, burst pressure, temperature cycle range, cleanliness limit, and whether ports are capped immediately after final inspection.
Driventus supports sourcing with process control and inspection records, and our quality system explains the controls used across production and final inspection. For broader part-family sourcing, see our catalog and the engine component range at /products/engine-components.html.
Repair, Reseal, Replace: Three Common Scenarios
Scenario one: the cooler body is clean, the sealing land is flat, and the first fresh oil appears at the gasket edge. Reseal it, using the correct profile and torque procedure. This is the low-risk case.
Scenario two: oil returns after a correct reseal, the flange is distorted, or the port area is pitted. Replace the cooler or the mating housing, depending on which surface has failed. Repeating the same seal job usually adds labour without solving the cause.
Scenario three: oil and coolant have mixed, or the cooler body shows a crack, impact mark, damaged port, or suspect plate stack. Replace the cooler assembly and flush or service the affected circuits as required. Field repair is rarely the lowest-risk option on high-mileage vehicles, hot engine bays, or parts without confirmed face flatness and pressure testing.
Fleet buyers should include the second teardown in the cost model. Labour, coolant refill, oil top-up, cleaning time, road testing, downtime, and comeback risk all belong in the replacement decision. If access time is 1.5-3.0 hours or more, the threshold for complete replacement is usually lower than it would be on an exposed adapter seal.
A controlled replacement part should be validated for:
Leak tightness at operating pressure and at the supplier's defined test pressure
Burst margin above normal service pressure
Seal compression under thermal cycling
Port alignment during installation without line strain
Compatibility with the existing oil filter base or adapter plate
Correct hose routing and clearance after installation
Clean internal passages and protected ports before assembly
After installation, run the engine to operating temperature, inspect the sealing line, recheck the oil level, and verify coolant condition where applicable. A final inspection after a short road test confirms whether the original leak path has been eliminated rather than temporarily cleaned away. Record the replaced part number, seal kit used, torque procedure, and post-test result for warranty traceability.
Commercial Questions That Change The Real Cost
A reliable aftermarket supply chain depends on repeatable fitment, stable production controls, and clear documentation. Buyers should ask for sample approval, measurement records, material information, packaging specifications, and protection that prevents fin damage, thread damage, or port contamination. For regional distributors, the commercial questions are lead time, MOQ, carton configuration, label requirements, warranty handling, and whether the part is supplied with seals.
For repair-chain and fleet customers, consistency matters as much as initial price. A cooler that requires extra cleaning, separate seal sourcing, port adaptation, or repeated fitment checks creates hidden workshop cost. In RFQ comparison, separate unit price from total landed and installed cost. Seal kit inclusion, port caps, barcode labels, carton strength, inspection paperwork, defect allowance, and lead time can change the real cost per repair. Confirm MOQ by SKU, price breaks at trial and production volumes, sample lead time, mass-production lead time, and whether mixed-SKU cartons or private labels are available.
Driventus exports to 60+ countries and works with aftermarket distributors, OEM and Tier-1 programmes, and repair-chain customers. Our focus is controlled production rather than claims about vehicle-maker endorsement. Driventus is an independent aftermarket manufacturer; brand names are referenced for fitment only.
When a platform-specific cooler is needed, send the OE reference, sample photos, engine code, installed-part images, and installation measurements through request a quote. Include expected annual volume, target market, packaging requirement, required certificates, and the requested delivery window. Complete data improves cross-reference accuracy and reduces the risk of ordering a visually similar cooler with the wrong mounting face or port layout.
Frequently asked questions
Yes. Many oil cooler leaks are external and only affect engine oil. A separate internal failure can cross-contaminate oil and coolant, so check both circuits if the residue looks emulsified, the coolant has an oily film, or the oil appears milky.
Replace the gasket only when the cooler body is intact, the face is flat, and the leak is clearly at the seal line. Replace the full cooler if the body is cracked, pitted, internally leaking, or if leaks return after correct installation.
Clean the area, run the engine warm, and inspect from the highest fresh wet point. UV dye helps when the leak is intermittent or spreads along brackets, hoses, shields, and the block face.
Send the OE reference if available, engine code, vehicle application, photos of the installed part, mounting dimensions, port type, seal requirements, expected volume, packaging needs, and any regional application notes. That reduces cross-reference errors.
For fitment checks, sample comparison, or production sourcing, send the application details through /contact.html.