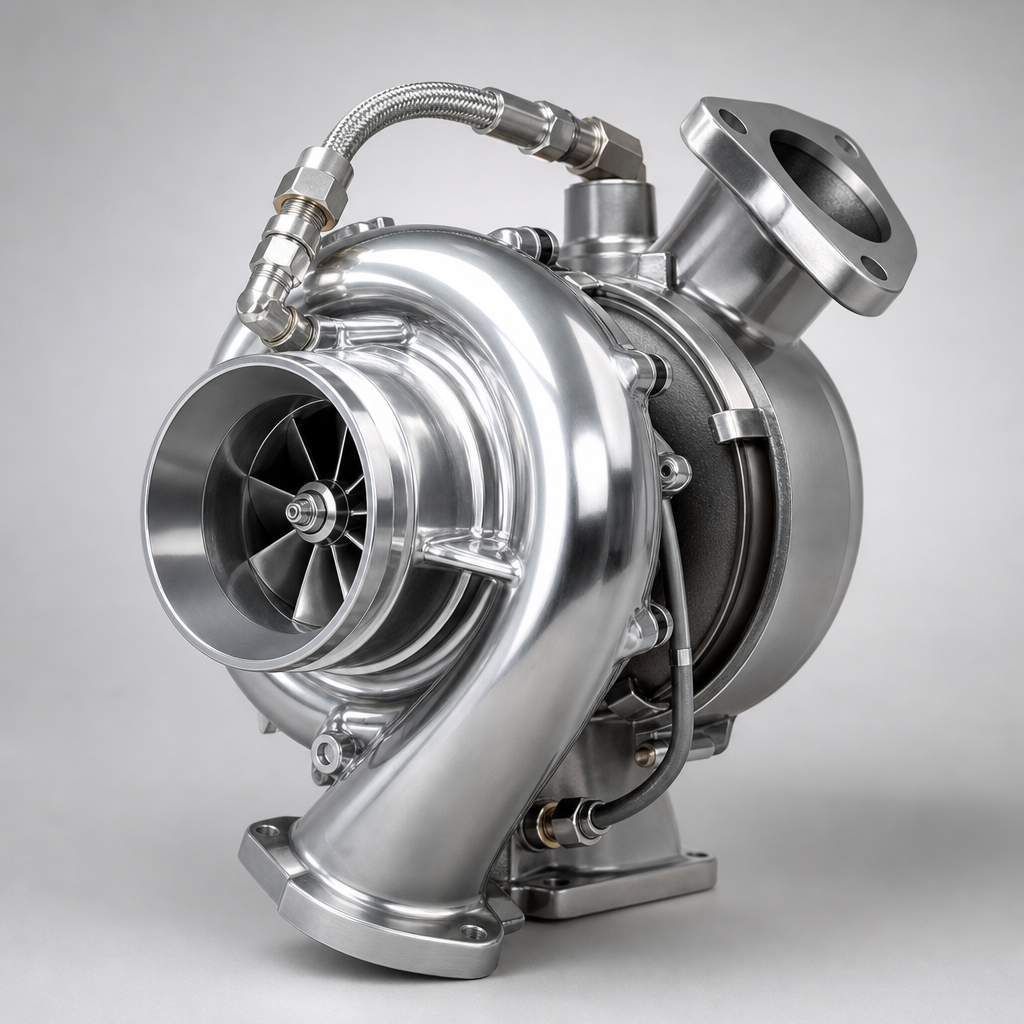
A high pressure oil pump 7 3 replacement is usually purchased because the old unit no longer builds pressure fast enough, struggles when hot, or shows internal wear that affects injector control. For a buyer, that makes this a reliability purchase, not a simple catalog-fill exercise. The replacement has to do more than bolt on. It has to hold OE-critical dimensions, seal correctly, and deliver stable pressure through repeated heat cycles without creating warranty noise.
That is where many aftermarket programs go wrong. A pump may look correct in photos yet still create repeat claims because of machining drift, weak material control, contamination, or vague testing. This article breaks the sourcing decision into practical angles: what “direct fit” should really mean, which failure modes deserve the most attention, how to compare suppliers without relying on marketing language, and what a sound replacement-part buying process looks like. The focus is B2B sourcing for distributors, repair networks, importers, and private-label programs. Driventus is an independent aftermarket manufacturer; brand names are referenced for fitment only.
Decision framework: what a direct-fit replacement must prove
For this product category, a direct-fit claim should answer one question: will the pump install cleanly and perform like the original under real service conditions? For a high pressure oil pump 7 3 replacement, that means checking every function-critical interface, not just the overall shape.
The replacement should match the original assembly in areas such as:
Mounting face geometry and bolt-hole position
Port thread form, thread depth, and sealing surface finish
Shaft, gear, or drive-interface dimensions where applicable
Internal leakage control at operating oil temperature
Seal compatibility with diesel-engine lubricants and additive packages
Pressure response during cold start and fully warmed operation
This is why "fits the application" is too weak for purchasing use. A supplier should be able to identify OE-equivalent inspection points, define controlled machining tolerances, and provide traceable lot records under IATF 16949:2016 and ISO 9001:2015 processes.
Ask for actual critical-to-function limits, not general assurances. Typical reference points include:
Mounting-hole positional tolerance: often within ±0.10 mm to ±0.15 mm
Sealing-face flatness: often ≤0.05 mm
Port thread verification: checked with GO/NO-GO gauges at 100% or defined sampling frequency
Machined sealing-surface roughness: commonly Ra 0.8-1.6 μm depending on gasket or O-ring design
Shaft or bore fit tolerance: commonly controlled in the ±0.01-0.03 mm range for critical interfaces
Commercial terms matter too, because direct-fit sourcing fails when technical approval and replenishment planning are treated separately. Typical buying logic for this product class looks like this:
Sample order: 1-5 pcs for fitment and bench review
Pilot order: 20-50 pcs for market validation or first private-label run
Standard MOQ: often 50-200 pcs per item depending on packaging and labeling requirements
Lead time: typically 30-45 days for repeat orders; 45-60 days if new packaging, new castings, or custom markings are involved
Price structure: lower for plain-box standard stock, higher for private label, barcode kits, added port caps, or expanded test reporting
If you are building out a wider diesel replacement range, it also helps to review adjacent engine products in our catalog and broader /products/engine-components.html coverage.
Spec deep-dive: the validation points that separate a usable pump from a risky one
A high pressure oil pump 7 3 replacement should be qualified on measurable controls, not appearance alone.
Check point
What to verify
Typical control target
Why it matters
Housing dimensions
Drawing-to-part inspection on machined datums
CTF dimensions usually held within ±0.02-0.15 mm depending on feature
Prevents installation mismatch
Port integrity
Thread accuracy, thread depth, sealing face flatness
GO/NO-GO thread pass; flatness often ≤0.05 mm
Reduces leak risk after installation
Pressure behaviour
Bench test across defined rpm and oil temperature
Stable output at specified test points with no abnormal drop-off
Confirms hydraulic output under load
Internal leakage
Controlled leakage limits at test pressure
Supplier should define a max leakage value per test condition
Affects hot restart and injector actuation
Surface finish
Machined sealing areas within specified roughness
Commonly Ra 0.8-1.6 μm
Supports gasket and seal durability
Material conformity
Housing and internal component material traceability
Heat/lot traceability to approved spec
Improves fatigue and wear resistance
Cleanliness
Residual chips and contamination after machining/assembly
Flushed, capped, and contamination-controlled
Reduces early scoring and valve issues
</tr></thead><tbody> </tbody></table>### What good bench control looks like
Procurement teams should ask for evidence of end-of-line or sample-based functional testing. One good report is not enough. Batch-to-batch repeatability matters more, especially in export aftermarket programs.
A practical test routine for this pump type often includes:
Test oil at controlled viscosity and temperature, for example 40°C and 80-90°C comparison points
Pressure reading at multiple speed points, such as idle-equivalent, mid-range, and high-rpm simulation
Pressure-hold or decay check for 10-30 seconds at a defined setpoint
External leak inspection at ports, plugs, seams, and seals
Noise or abnormal vibration screening during bench rotation
Sample tear-down verification during first article or periodic audit lots
Do not settle for "tested OK." Request the exact standard behind the result:
Test specification number or internal SOP reference
Gauge calibration interval, commonly 6 or 12 months depending on equipment
Sampling plan, such as 100% thread check + AQL-based dimensional audit + batch functional test
Non-conformance handling process, including segregation, rework approval, and lot release authority
A capable supplier should also explain how non-conforming lots are quarantined, how gauge calibration is controlled, and how process changes are documented within the quality system.
Failure-mode view: where replacement programs usually break down
Understanding why pumps are replaced helps buyers set a smarter incoming inspection plan. The most common field failures are not mysterious; they usually trace back to a handful of repeat issues.
Common failure modes include:
Internal wear that reduces pressure efficiency and slows hot-start pressure build
Seal degradation that causes oil leakage or pressure loss under temperature cycling
Scoring caused by contaminated lubricant or insufficient post-machining cleanliness
Machining deviations in lower-grade aftermarket units, especially at ports and sealing faces
Fatigue-related cracking in stressed sections or around fastener bosses
Sticking valves or unstable internal control behaviour caused by burrs or surface damage
Commercially, those failures turn into two expensive outcomes: comeback labor claims and loss of installer trust. That is why dimensional match alone is not enough. The high pressure oil pump 7 3 replacement also has to maintain hydraulic performance after repeated hot and cold cycles.
A practical incoming inspection plan should align to the likely failure points:
Verify port threads with gauges instead of relying on visual checks
Inspect sealing-face finish and flatness on each incoming lot
Confirm lot code traceability back to machining and assembly date
Spot-check protective caps and anti-corrosion packaging before warehousing
Require retained test records for at least 12-24 months for warranty lookup
Where elastomers, coatings, or restricted substances are relevant, documentation should also align with REACH (EC) No 1907/2006 for EU-facing programs. Many multinational buyers now request the same declaration set even for non-EU shipments.
One useful question for suppliers: what kind of warranty pattern shows up most often—cold-start complaints, hot-start complaints, or external leakage returns? The answer usually points to the real risk area, whether that is internal leakage control, seal material, or machining accuracy.
Comparison model: how to rank aftermarket suppliers without guesswork
When several suppliers offer the same application, the fastest way to cut through catalog language is to score them on a short list of technical and commercial controls.
A workable scorecard should cover:
Drawing control: Supplier can identify critical-to-function dimensions, tolerances, gauges, and inspection frequency
Test coverage: Functional pressure and leak testing documented by batch, shift, or 100% EOL where agreed
Traceability: Lot coding linked to material, machining, assembly, and final inspection records
Packaging control: Corrosion protection, port protection, carton strength, and transport stability
Documentation: PPAP-style data or equivalent dimensional, material, and test records where required
Capacity: Stable lead times, export packing discipline, and clear replenishment planning
Then compare every quote on the same commercial basis:
MOQ per SKU: for example 50, 100, or 200 pcs
Price breakpoints: sample, pilot, standard MOQ, and annual volume pricing
Lead time by order type: sample, repeat stock order, private-label order, and custom-spec order
Tooling or setup charges: for revised packaging, laser marking, labels, or port modifications
Warranty support terms: claim window, evidence required, and replacement/credit process
This is where many buyers save money the wrong way. A pump that is 3-8% cheaper on ex-works price can become the more expensive program once leakage inconsistency, claim review time, and installer pushback are factored in.
A few rules of thumb help during comparison:
Lower MOQ usually raises unit cost because setup, packaging, and test overhead are spread over fewer parts
Private-label cartons, barcodes, and instruction inserts normally add cost and may extend lead time by 7-15 days
Stronger corrosion protection and individual port caps can reduce damage claims in sea freight programs
Mixed-container or mixed-SKU shipments may improve landed cost if the supplier can consolidate related engine components
A supplier with integrated machining and quality controls is usually better positioned to support private-label programs and range expansion. If your business needs modified ports, packaging changes, or market-specific specifications, custom manufacturing should be part of the conversation from the start.
For longer-term replacement programs, it also makes sense to ask whether the supplier can support related components in the same engine family. That can reduce audit workload and simplify vendor consolidation.
Step-by-step sourcing scenario: how replacement-part buyers typically run the project
Most sourcing problems come from jumping straight from RFQ to production. A better approach is to stage the project so technical risk is reduced before volume is released.
For a high pressure oil pump 7 3 replacement program, the process usually looks like this:
1. RFQ review: buyer shares OE reference, photos, drawings if available, target market, and annual demand estimate 2. Technical confirmation: supplier reviews fitment, critical dimensions, test method, and any required labeling or box artwork 3. Sampling stage: samples sent for fitment and bench validation, usually before full private-label release 4. Commercial alignment: MOQ, unit price, packaging cost, incoterm, and lead time are finalized 5. Production release: lot scheduling, inspection plan, marking, and shipping window are confirmed 6. Repeat-order control: batch records, claim feedback, and any field corrections are tracked for future orders
In practice, buyers usually focus on a few recurring concerns:
Stable batch quality across recurring orders
Clear product identification and private-label packaging options
Inspection records for critical dimensions
Functional validation data by agreed sampling plan
Export-ready logistics support for mixed product shipments
Commercial clarity on MOQ, lead time, and packaging cost impact
This staged approach also makes the real cost drivers easier to see:
Standard unbranded supply generally gives the shortest lead time and lowest unit cost
Private-label supply usually requires artwork approval and may increase MOQ
Additional inspection reports, barcode labels, inner boxes, or kitting can add both cost and handling time
Forecast visibility of 60-90 days often improves scheduling stability and reduces rush-order risk
Because this is a replacement-focused purchase, catalog breadth should not lead the decision. Measurable conformity, documented controls, and responsive technical support matter more.
Driventus supplies aftermarket engine and powertrain components for B2B buyers in export markets. For replacement-part programs, support typically includes dimensional review, material verification, production traceability, and export documentation suited to distributor and repair-chain requirements.
Driventus is an independent aftermarket manufacturer; brand names are referenced for fitment only.
Frequently asked questions
Request dimensional inspection data for critical features, thread and sealing-face checks, material confirmation, pressure or leak-test evidence, lot traceability details, packaging specifications, MOQ, and repeat-order lead time. For recurring programs, batch consistency records and a defined acceptance standard are usually more valuable than a one-off sample result.
No. Visual similarity does not confirm port accuracy, internal leakage control, sealing-face finish, cleanliness level, or pressure stability at operating temperature. A dependable high pressure oil pump 7 3 replacement should be validated by both dimensional inspection and functional testing.
Yes. For distributors and larger procurement programs, Driventus can discuss packaging, identification, barcode labeling, and specification alignment as part of custom manufacturing and export supply planning. MOQ, unit price, and lead time typically vary depending on how much customization is required.
If you are qualifying a new supply source for replacement engine components, you can review the technical scope and send your requirements to **[request a quote](/contact.html)**, including target MOQ, annual volume, packaging needs, and any inspection or test-report requirements.